![Home](images/skins/default/icon_regions_owned.png)
![Cavalleria leggera celta mercenaria](https://www.honga.net/totalwar/rome2/gen_images/unit_icon/rome2/emp_marcomanni/Mer_Cel_Light_Horse.png)
![Marcomanni (Imperator Augustus)](https://www.honga.net/totalwar/rome2/images/rome2/flags/marcomanni/mon_24.png)
Cavalleria leggera celta mercenaria
L’abile cavalleria è sempre apprezzata e vale il denaro pagato perché garantisca i suoi servizi.I Celti tenevano i cavalli in gran conto: si trattava di un bene di prestigio ed erano riveriti per la loro forza e vitalità. Di conseguenza, la cavalleria celtica, come quella di molti eserciti, era appannaggio della ricca nobiltà.
Grazie allo sviluppo della tecnologia delle selle, i cavalieri beneficiavano di un sedile fermo senza la necessità di avere staffe: vi erano quattro pomelli che tenevano ferme le cosce del cavaliere che, ora, aveva maggior spazio di manovra quando usava una spada o una lancia. Grazie a questi miglioramenti, emersero le tattiche di cavalleria e ci fu il declino dei carri a due uomini, che non erano più le uniche truppe a poter vantare una grande velocità di movimento. Alcuni cavalieri erano armati di spade lunghe e, così come anche i tradizionali guidatori di carri, dovevano anche smontare da cavallo e combattere come fanti.
I cavalieri celti diventarono molto richiesti come mercenari e, col passare dei secoli, finirono col servire nell’esercito cartaginese, egizio e romano.
![]() |
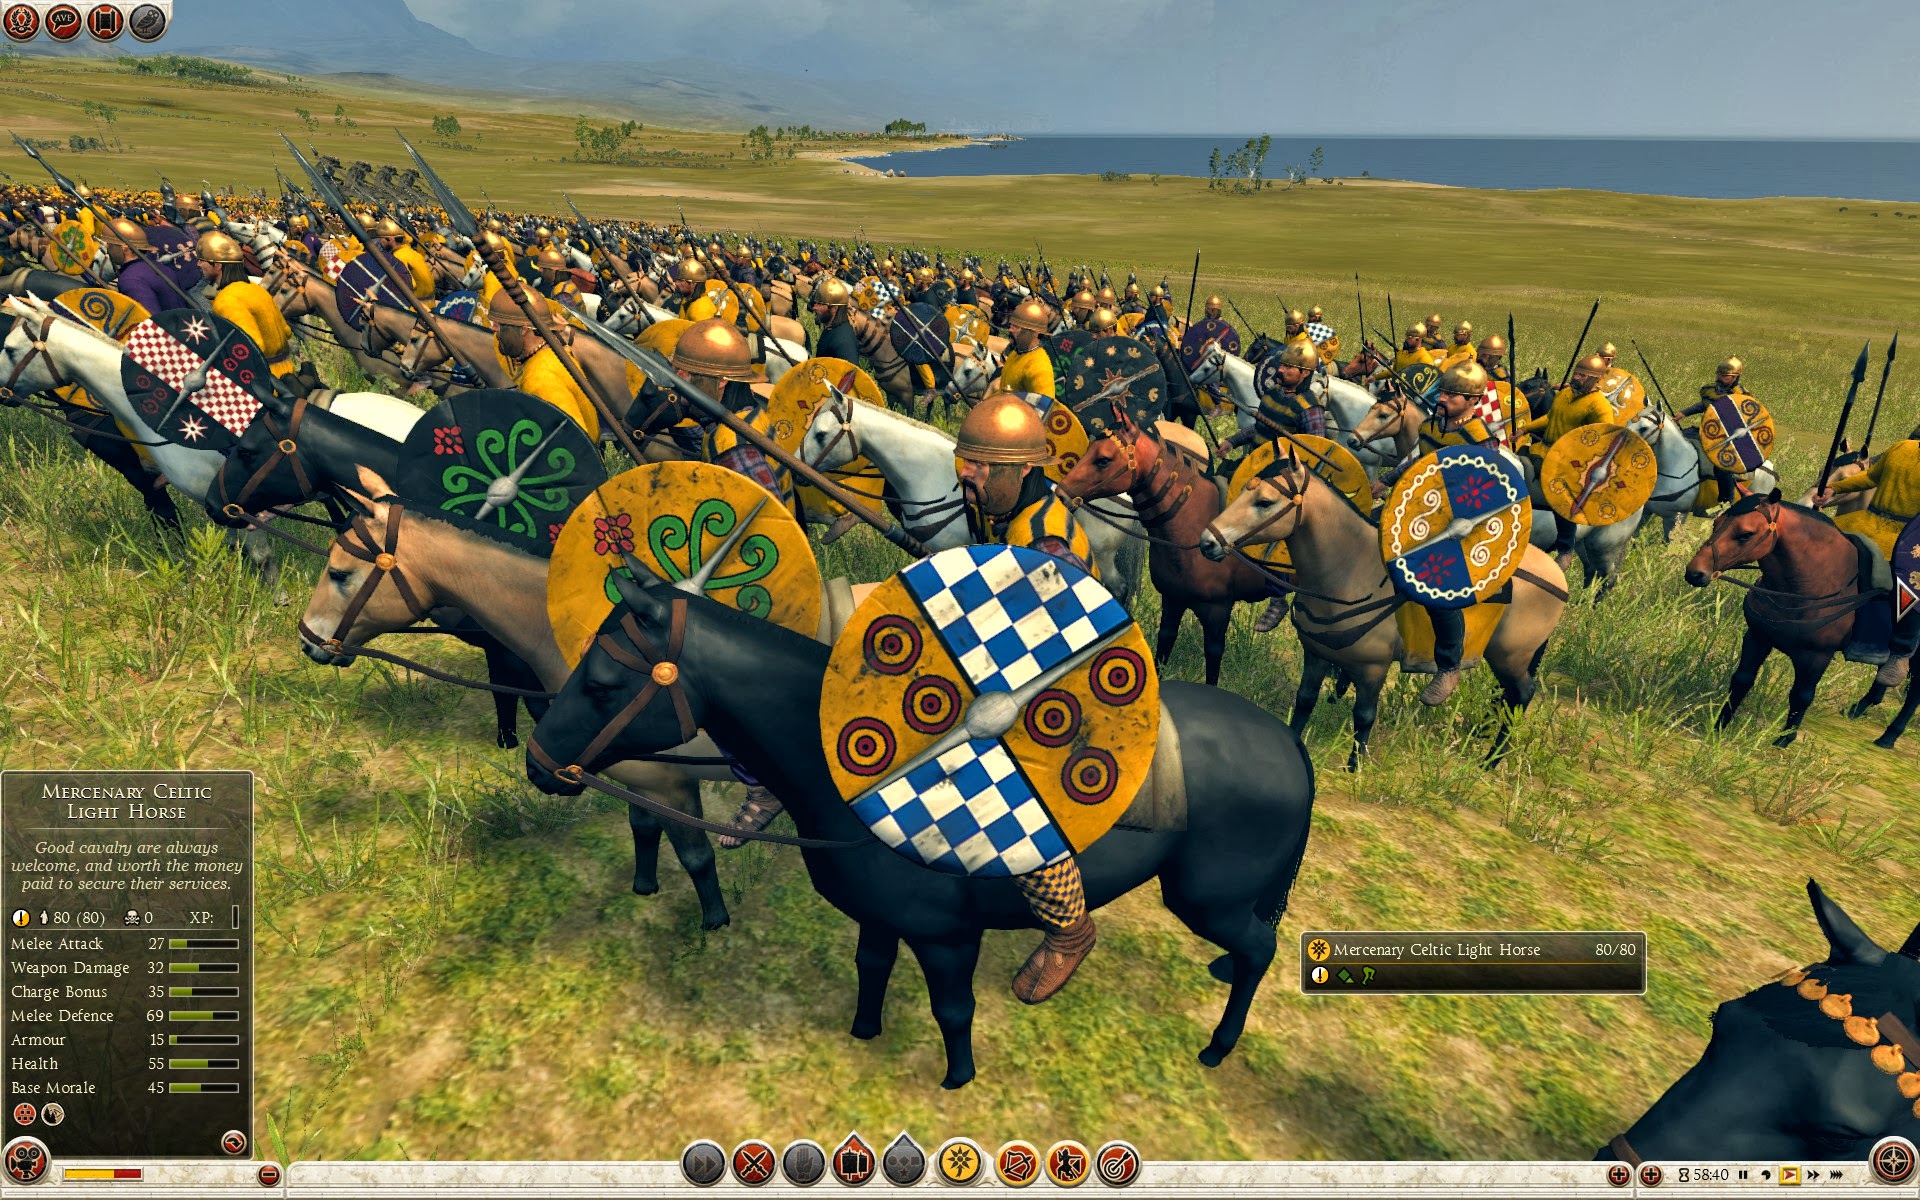
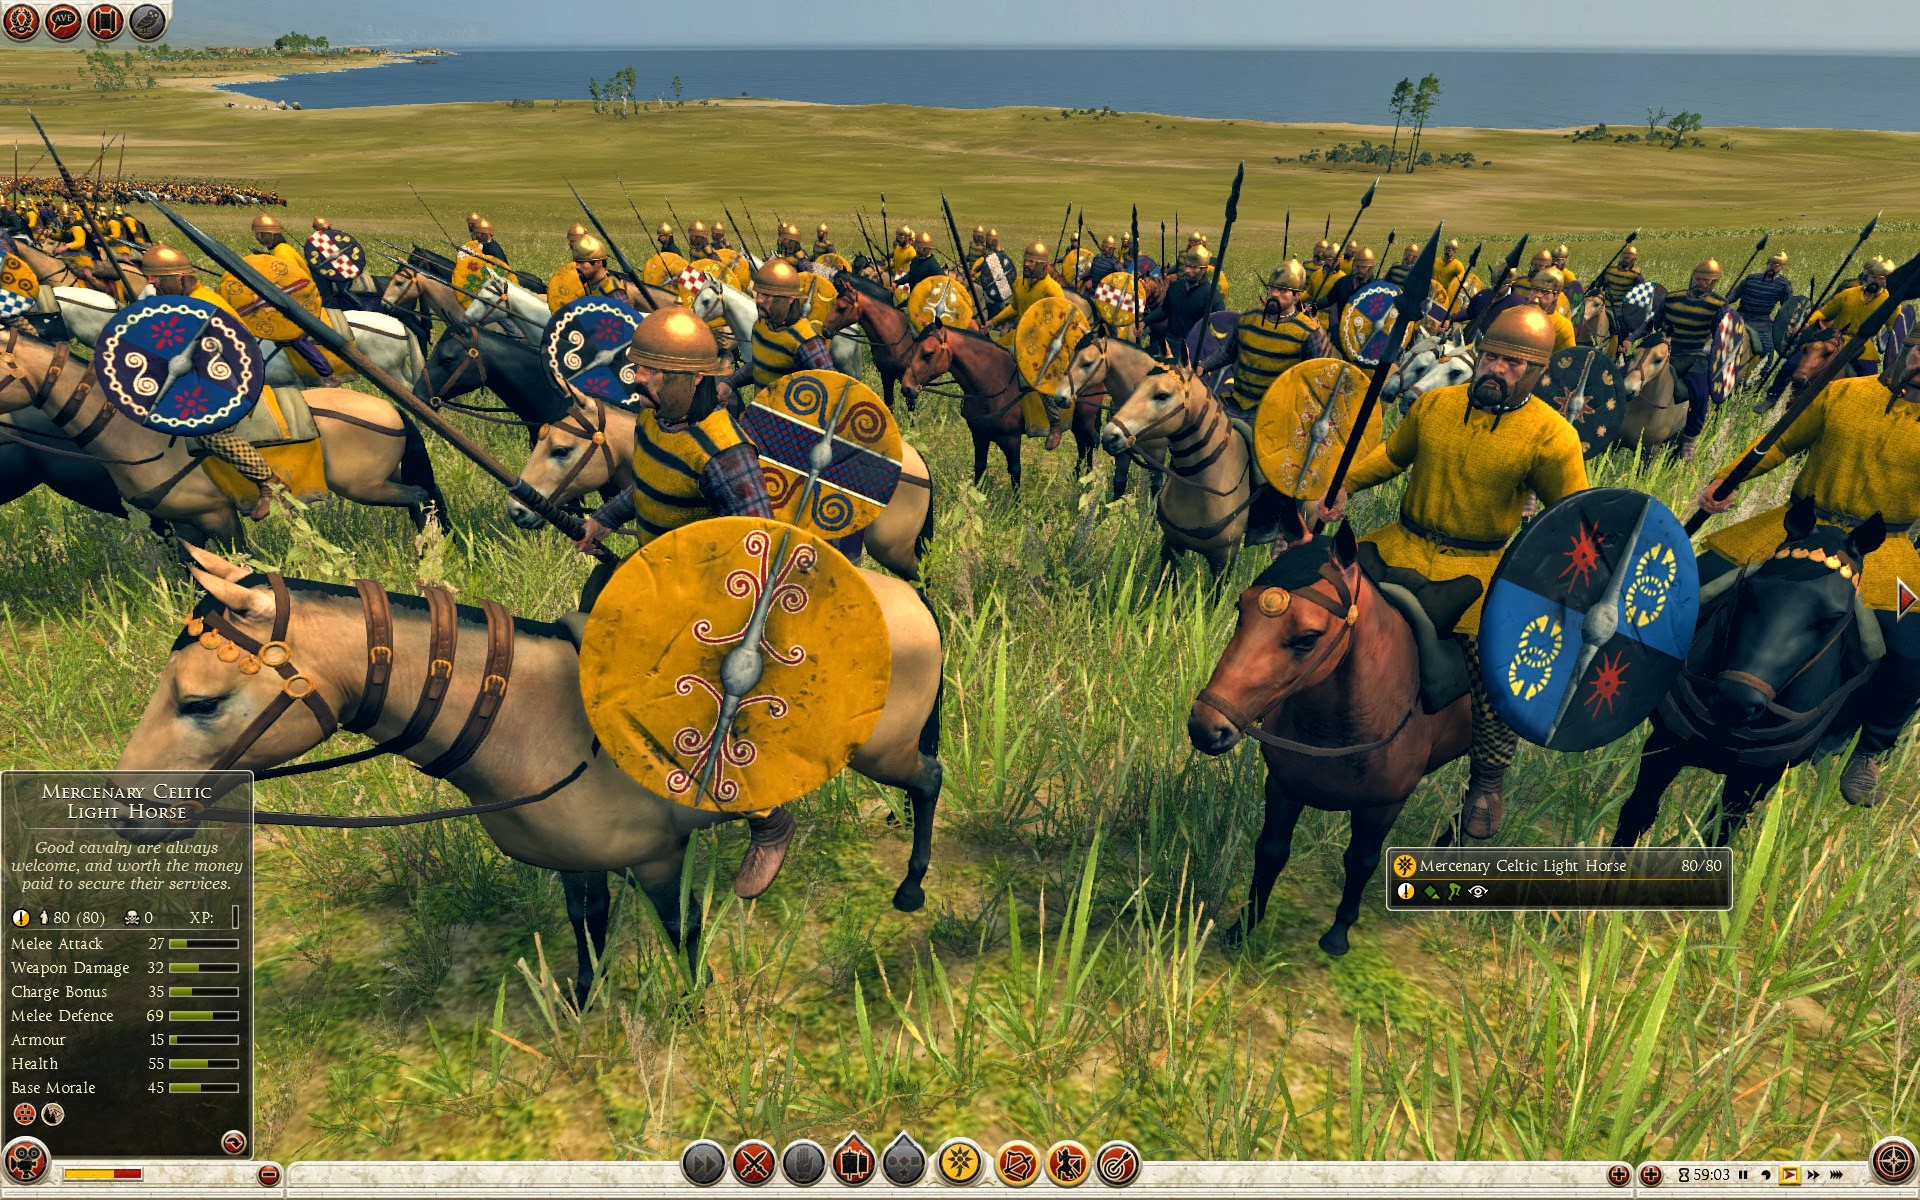
Unit Name Cavalleria leggera celta mercenaria |
Main Unit Key Mer_Cel_Light_Horse |
Land Unit Key Mer_Cel_Light_Horse |
Naval Unit Key barbarian_transport_small |
Soldiers 80 |
Category Cavalleria |
Class Cavalleria corpo a corpo |
Battaglia personalizzata Costo 450 |
Costo reclutam. 340 |
Costi mantenim. 250 |
Danno proiettili 32 |
├ Missile Weapon rome_javelin_precursor |
├ Projectile javelin_prec |
├ Missile Damage 20 |
├ Missile Ap Damage 12 |
└ Base Reload Time 15 |
Precisione 5 |
Portata 40 |
Reload 0 |
Colpi al minuto 4 |
Munizioni 2 |
Attacco CC 42 |
Danno arma 27 |
├ Melee Weapon rome_celtic_spear_cav |
├ Danni corpo a corpo standard 20 |
├ Danni corpo a corpo (armi) 7 |
├ Armour Piercing No |
├ Bonus vs grandi 10 |
├ Bonus vs elefanti 10 |
└ Bonus vs fanteria 0 |
Bonus di carica 39 |
Difesa CC 56 |
├ Base Defence 16 |
├ Shield caetra_cavalry |
└ Difesa scudo 40 |
Armatura 15 |
├ Armatura cloth |
├ Armour Defence 10 |
└ Corazza scudo 5 |
Salute 75 |
├ Man Entity rome_infantry_light |
├ Man Health 40 |
├ Bonus Hit Points 10 |
├ Mount rome_celtic_horse_spear_shield_l |
├ Mount Entity rome_horse_light |
└ Mount Health 25 |
Morale di base 45 |
Abilità
Cavalleria leggera celta mercenaria- Cuneo
L’unità si muove in una formazione d’attacco a forma di cuneo.
Bonus carica, attacco corpo a corpo
Accelerazione, difesa corpo a corpo - Carica frenetica
Aumenta l’efficacia della carica di un’unità per un certo periodo. L’unità subirà un’ingente penalità fatica dopo la fine della carica.
Velocità della carica, danni della carica, accelerazione
Difesa corpo a corpo, fatica
Attributi
- Nascondersi (foresta)
Questa unità può nascondersi nelle foreste finché il nemico non è troppo vicino.
Forze e debolezze
Nave da trasporto leggera- Pessima resistenza dello scafo
- Molto lenta
- Speronamento leggero
- Attacco medio
- Difesa media
- Danno basso ma penetrazione dell’armatura media
- Morale scarso
Gallia Mercenari Pool
Mercenari Pool | |||||||
---|---|---|---|---|---|---|---|
|
|||||||
No. | Pool | Province | Region | Initial Unit Count | Chance To Replenish | Max Replenish Per Turn | Max Count |
1 | gaul_province_pool_arduenna_silva | Arduenna Silva |
Divoduron Durocorteron Noviodunon Treverorum |
1 | 0.15 | 1 | 3 |
2 | gaul_province_pool_germania_inferior | Germania inferior |
Atuatuca Bagacum |
1 | 0.15 | 1 | 3 |
3 | gaul_province_pool_helvetia | Helvetia |
Octoduron Turicum |
1 | 0.15 | 1 | 3 |
4 | gaul_province_pool_insubria | Insubria |
Medhelan Vercelum |
1 | 0.15 | 1 | 3 |
5 | gaul_province_pool_liguria | Liguria |
Genua Pollentia |
1 | 0.15 | 1 | 3 |
6 | gaul_province_pool_maxima_sequanorum | Maxima Sequanorum |
Rauricon Vesontium |
1 | 0.15 | 1 | 3 |
7 | gaul_province_pool_silva_carbonaria | Silva Carbonaria |
Bratuspantion Gesoriacum Nemetocenna |
1 | 0.15 | 1 | 3 |
Hannibal ad portas Mercenari Pool
Mercenari Pool | |||||||
---|---|---|---|---|---|---|---|
|
|||||||
No. | Pool | Province | Region | Initial Unit Count | Chance To Replenish | Max Replenish Per Turn | Max Count |
8 | pun_province_pool_aquitania | Aquitania |
Burdigala Iruña |
0 | 0.5 | 1 | 3 |
Impero diviso Mercenari Pool
Mercenari Pool | |||||||
---|---|---|---|---|---|---|---|
|
|||||||
No. | Pool | Province | Region | Initial Unit Count | Chance To Replenish | Max Replenish Per Turn | Max Count |
9 | rom_province_pool_hercynia | Hercynia |
Bergium Budorgis Istros |
0 | 0.15 | 1 | 3 |
10 | rom_province_pool_pannonia | Pannonia |
Aquincum Segestica Singidun |
0 | 0.15 | 1 | 3 |
11 | rom_province_pool_provincia | Narbonensis |
Massilia Narbo Tolosa |
0 | 0.15 | 1 | 3 |
12 | rom_province_pool_raetia_et_noricum | Raetia et Noricum |
Kelheim Koria Noreia Octoduron |
0 | 0.15 | 1 | 3 |
13 | rom_province_pool_belgica | Belgica |
Nemecatum Treverorum |
0 | 0.15 | 1 | 3 |
14 | rom_province_pool_cisalpina | Cisalpina |
Genua Mediolanium Patavium |
0 | 0.15 | 1 | 3 |
Grande campagna Mercenari Pool
Mercenari Pool | |||||||
---|---|---|---|---|---|---|---|
|
|||||||
No. | Pool | Province | Region | Initial Unit Count | Chance To Replenish | Max Replenish Per Turn | Max Count |
15 | rom_province_pool_hercynia | Hercynia |
Casurgis Istros |
0 | 0.15 | 1 | 3 |
16 | rom_province_pool_pannonia | Pannonia |
Singidun Segestica Akink |
0 | 0.15 | 1 | 3 |
17 | rom_province_pool_provincia | Provincia |
Tolosa Massalia |
0 | 0.15 | 1 | 3 |
18 | rom_province_pool_raetia_et_noricum | Raetia et Noricum |
Octodurus Noreia Koria |
0 | 0.15 | 1 | 3 |
19 | rom_province_pool_belgica | Belgica |
Treverorum Nemetocenna |
0 | 0.15 | 1 | 3 |
20 | rom_province_pool_cisalpina | Cisalpina |
Medhelan Genua Patavium |
0 | 0.15 | 1 | 3 |
Fazione Mercenari Pool
Mercenari Pool | ||||||
---|---|---|---|---|---|---|
No. | Pool | Faction | Initial Unit Count | Chance To Replenish | Max Replenish Per Turn | Max Count |
21 | rom_faction_pool_carthage | 1 | 0.15 | 1 | 3 |
![](https://www.honga.net/totalwar/rome2/images/rome2/flags/tarbelli/mon_24.png)
![](https://www.honga.net/totalwar/rome2/images/rome2/flags/vivisci/mon_24.png)
![](https://www.honga.net/totalwar/rome2/images/rome2/flags/ausci/mon_24.png)
![](https://www.honga.net/totalwar/rome2/images/rome2/flags/sotiates/mon_24.png)
![](https://www.honga.net/totalwar/rome2/images/rome2/flags/mediomatrici/mon_24.png)
![](https://www.honga.net/totalwar/rome2/images/rome2/flags/remi/mon_24.png)
![](https://www.honga.net/totalwar/rome2/images/rome2/flags/suessiones/mon_24.png)
![](https://www.honga.net/totalwar/rome2/images/rome2/flags/treverii/mon_24.png)
![](https://www.honga.net/totalwar/rome2/images/rome2/flags/redones/mon_24.png)
![](https://www.honga.net/totalwar/rome2/images/rome2/flags/veneti_gaul/mon_24.png)
![](https://www.honga.net/totalwar/rome2/images/rome2/flags/namnetes/mon_24.png)
![](https://www.honga.net/totalwar/rome2/images/rome2/flags/osismii/mon_24.png)
![](https://www.honga.net/totalwar/rome2/images/rome2/flags/cantiaci/mon_24.png)
![](https://www.honga.net/totalwar/rome2/images/rome2/flags/dumnonii/mon_24.png)
![](https://www.honga.net/totalwar/rome2/images/rome2/flags/belgae/mon_24.png)
![](https://www.honga.net/totalwar/rome2/images/rome2/flags/bituriges/mon_24.png)
![](https://www.honga.net/totalwar/rome2/images/rome2/flags/lemovices/mon_24.png)
![](https://www.honga.net/totalwar/rome2/images/rome2/flags/arverni/mon_24.png)
![](https://www.honga.net/totalwar/rome2/images/rome2/flags/eburones/mon_24.png)
![](https://www.honga.net/totalwar/rome2/images/rome2/flags/nervii/mon_24.png)
![](https://www.honga.net/totalwar/rome2/images/rome2/flags/helvetii/mon_24.png)
![](https://www.honga.net/totalwar/rome2/images/rome2/flags/tulingi/mon_24.png)
![](https://www.honga.net/totalwar/rome2/images/rome2/flags/rome/mon_24.png)
![](https://www.honga.net/totalwar/rome2/images/rome2/flags/aedui/mon_24.png)
![](https://www.honga.net/totalwar/rome2/images/rome2/flags/allobroges/mon_24.png)
![](https://www.honga.net/totalwar/rome2/images/rome2/flags/carnutes/mon_24.png)
![](https://www.honga.net/totalwar/rome2/images/rome2/flags/unelli/mon_24.png)
![](https://www.honga.net/totalwar/rome2/images/rome2/flags/lexovii/mon_24.png)
![](https://www.honga.net/totalwar/rome2/images/rome2/flags/cenomani/mon_24.png)
![](https://www.honga.net/totalwar/rome2/images/rome2/flags/suebi/mon_24.png)
![](https://www.honga.net/totalwar/rome2/images/rome2/flags/sequani/mon_24.png)
![](https://www.honga.net/totalwar/rome2/images/rome2/flags/cadurci/mon_24.png)
![](https://www.honga.net/totalwar/rome2/images/rome2/flags/rome/mon_24.png)
![](https://www.honga.net/totalwar/rome2/images/rome2/flags/ruteni/mon_24.png)
![](https://www.honga.net/totalwar/rome2/images/rome2/flags/volcae/mon_24.png)
![](https://www.honga.net/totalwar/rome2/images/rome2/flags/turones/mon_24.png)
![](https://www.honga.net/totalwar/rome2/images/rome2/flags/pictones/mon_24.png)
![](https://www.honga.net/totalwar/rome2/images/rome2/flags/santones/mon_24.png)
![](https://www.honga.net/totalwar/rome2/images/rome2/flags/senones/mon_24.png)
![](https://www.honga.net/totalwar/rome2/images/rome2/flags/mandubii/mon_24.png)
![](https://www.honga.net/totalwar/rome2/images/rome2/flags/parisii/mon_24.png)
![](https://www.honga.net/totalwar/rome2/images/rome2/flags/bellovaci/mon_24.png)
![](https://www.honga.net/totalwar/rome2/images/rome2/flags/morini/mon_24.png)
![](https://www.honga.net/totalwar/rome2/images/rome2/flags/atrebartes/mon_24.png)
![](https://www.honga.net/totalwar/rome2/images/rome2/flags/vangiones/mon_24.png)
![](https://www.honga.net/totalwar/rome2/images/rome2/flags/nemetes/mon_24.png)
![](https://www.honga.net/totalwar/rome2/images/rome2/flags/suebi/mon_24.png)
![](https://www.honga.net/totalwar/rome2/images/rome2/flags/massilia/mon_24.png)
![](https://www.honga.net/totalwar/rome2/images/rome2/flags/vocontii/mon_24.png)
![](https://www.honga.net/totalwar/rome2/images/rome2/flags/massyli/mon_24.png)
![](https://www.honga.net/totalwar/rome2/images/rome2/flags/carthage/mon_24.png)
![](https://www.honga.net/totalwar/rome2/images/rome2/flags/tarbelli/mon_24.png)
![](https://www.honga.net/totalwar/rome2/images/rome2/flags/vascones/mon_24.png)
![](https://www.honga.net/totalwar/rome2/images/rome2/flags/oretani/mon_24.png)
![](https://www.honga.net/totalwar/rome2/images/rome2/flags/arevaci/mon_24.png)
![](https://www.honga.net/totalwar/rome2/images/rome2/flags/carpetani/mon_24.png)
![](https://www.honga.net/totalwar/rome2/images/rome2/flags/rome/mon_24.png)
![](https://www.honga.net/totalwar/rome2/images/rome2/flags/etruscan%20league/mon_24.png)
![](https://www.honga.net/totalwar/rome2/images/rome2/flags/rome/mon_24.png)
![](https://www.honga.net/totalwar/rome2/images/rome2/flags/etruscan%20league/mon_24.png)
![](https://www.honga.net/totalwar/rome2/images/rome2/flags/astures/mon_24.png)
![](https://www.honga.net/totalwar/rome2/images/rome2/flags/galleaci/mon_24.png)
![](https://www.honga.net/totalwar/rome2/images/rome2/flags/vaccaei/mon_24.png)
![](https://www.honga.net/totalwar/rome2/images/rome2/flags/cantabri/mon_24.png)
![](https://www.honga.net/totalwar/rome2/images/rome2/flags/liguria/mon_24.png)
![](https://www.honga.net/totalwar/rome2/images/rome2/flags/veneti/mon_24.png)
![](https://www.honga.net/totalwar/rome2/images/rome2/flags/senones/mon_24.png)
![](https://www.honga.net/totalwar/rome2/images/rome2/flags/insubres/mon_24.png)
![](https://www.honga.net/totalwar/rome2/images/rome2/flags/allobroges/mon_24.png)
![](https://www.honga.net/totalwar/rome2/images/rome2/flags/massilia/mon_24.png)
![](https://www.honga.net/totalwar/rome2/images/rome2/flags/volcae/mon_24.png)
![](https://www.honga.net/totalwar/rome2/images/rome2/flags/cessetani/mon_24.png)
![](https://www.honga.net/totalwar/rome2/images/rome2/flags/emporion/mon_24.png)
![](https://www.honga.net/totalwar/rome2/images/rome2/flags/illergetes/mon_24.png)
![](https://www.honga.net/totalwar/rome2/images/rome2/flags/illercavones/mon_24.png)
![](https://www.honga.net/totalwar/rome2/images/rome2/flags/carthage/mon_24.png)
![](https://www.honga.net/totalwar/rome2/images/rome2/flags/rome/mon_24.png)
![](https://www.honga.net/totalwar/rome2/images/rome2/flags/celtici/mon_24.png)
![](https://www.honga.net/totalwar/rome2/images/rome2/flags/vettones/mon_24.png)
![](https://www.honga.net/totalwar/rome2/images/rome2/flags/lusitani/mon_24.png)
![](https://www.honga.net/totalwar/rome2/images/rome2/flags/samnites/mon_24.png)
![](https://www.honga.net/totalwar/rome2/images/rome2/flags/rome/mon_24.png)
![](https://www.honga.net/totalwar/rome2/images/rome2/flags/gaetuli/mon_24.png)
![](https://www.honga.net/totalwar/rome2/images/rome2/flags/masaesyli/mon_24.png)
![](https://www.honga.net/totalwar/rome2/images/rome2/flags/carthage/mon_24.png)
![](https://www.honga.net/totalwar/rome2/images/rome2/flags/mauri/mon_24.png)
![](https://www.honga.net/totalwar/rome2/images/rome2/flags/massyli/mon_24.png)
![](https://www.honga.net/totalwar/rome2/images/rome2/flags/carthage/mon_24.png)
![](https://www.honga.net/totalwar/rome2/images/rome2/flags/masaesyli/mon_24.png)
![](https://www.honga.net/totalwar/rome2/images/rome2/flags/samnites/mon_24.png)
![](https://www.honga.net/totalwar/rome2/images/rome2/flags/rome/mon_24.png)
![](https://www.honga.net/totalwar/rome2/images/rome2/flags/syracuse/mon_24.png)
![](https://www.honga.net/totalwar/rome2/images/rome2/flags/libya/mon_24.png)
![](https://www.honga.net/totalwar/rome2/images/rome2/flags/garamantia/mon_24.png)
![](https://www.honga.net/totalwar/rome2/images/rome2/flags/carthage/mon_24.png)
![](https://www.honga.net/totalwar/rome2/images/rome2/flags/turdetani/mon_24.png)
![](https://www.honga.net/totalwar/rome2/images/rome2/flags/rome/mon_24.png)
![](https://www.honga.net/totalwar/rome2/images/rome2/flags/etruscan%20league/mon_24.png)
![](https://www.honga.net/totalwar/rome2/images/rome2/flags/3c_roman_empire_2/mon_24.png)
![](https://www.honga.net/totalwar/rome2/images/rome2/flags/3c_egypt/mon_24.png)
![](https://www.honga.net/totalwar/rome2/images/rome2/flags/axum/mon_24.png)
![](https://www.honga.net/totalwar/rome2/images/rome2/flags/meroe/mon_24.png)
![](https://www.honga.net/totalwar/rome2/images/rome2/flags/blemmyes/mon_24.png)
![](https://www.honga.net/totalwar/rome2/images/rome2/flags/3c_roman_empire_2/mon_24.png)
![](https://www.honga.net/totalwar/rome2/images/rome2/flags/3c_gallic_empire/mon_24.png)
![](https://www.honga.net/totalwar/rome2/images/rome2/flags/himyar/mon_24.png)
![](https://www.honga.net/totalwar/rome2/images/rome2/flags/mascat/mon_24.png)
![](https://www.honga.net/totalwar/rome2/images/rome2/flags/saba/mon_24.png)
![](https://www.honga.net/totalwar/rome2/images/rome2/flags/3c_lakhmids/mon_24.png)
![](https://www.honga.net/totalwar/rome2/images/rome2/flags/gerrhaea/mon_24.png)
![](https://www.honga.net/totalwar/rome2/images/rome2/flags/ma'in/mon_24.png)
![](https://www.honga.net/totalwar/rome2/images/rome2/flags/3c_margiana/mon_24.png)
![](https://www.honga.net/totalwar/rome2/images/rome2/flags/armenia/mon_24.png)
![](https://www.honga.net/totalwar/rome2/images/rome2/flags/3c_lydia/mon_24.png)
![](https://www.honga.net/totalwar/rome2/images/rome2/flags/3c_baktria/mon_24.png)
![](https://www.honga.net/totalwar/rome2/images/rome2/flags/3c_lusitania/mon_24.png)
![](https://www.honga.net/totalwar/rome2/images/rome2/flags/3c_hispania/mon_24.png)
![](https://www.honga.net/totalwar/rome2/images/rome2/flags/3c_gallic_empire/mon_24.png)
![](https://www.honga.net/totalwar/rome2/images/rome2/flags/3c_lydia/mon_24.png)
![](https://www.honga.net/totalwar/rome2/images/rome2/flags/3c_bosporou/mon_24.png)
![](https://www.honga.net/totalwar/rome2/images/rome2/flags/3c_britannia/mon_24.png)
![](https://www.honga.net/totalwar/rome2/images/rome2/flags/3c_sassanid/mon_24.png)
![](https://www.honga.net/totalwar/rome2/images/rome2/flags/ardhan/mon_24.png)
![](https://www.honga.net/totalwar/rome2/images/rome2/flags/kartli/mon_24.png)
![](https://www.honga.net/totalwar/rome2/images/rome2/flags/colchis/mon_24.png)
![](https://www.honga.net/totalwar/rome2/images/rome2/flags/dahae/mon_24.png)
![](https://www.honga.net/totalwar/rome2/images/rome2/flags/rome_civil_war/mon_24.png)
![](https://www.honga.net/totalwar/rome2/images/rome2/flags/roxolani/mon_24.png)
![](https://www.honga.net/totalwar/rome2/images/rome2/flags/3c_gothic/mon_24.png)
![](https://www.honga.net/totalwar/rome2/images/rome2/flags/roxolani/mon_24.png)
![](https://www.honga.net/totalwar/rome2/images/rome2/flags/3c_roman_empire_2/mon_24.png)
![](https://www.honga.net/totalwar/rome2/images/rome2/flags/3c_galatia/mon_24.png)
![](https://www.honga.net/totalwar/rome2/images/rome2/flags/3c_gallic_empire/mon_24.png)
![](https://www.honga.net/totalwar/rome2/images/rome2/flags/3c_sakastan/mon_24.png)
![](https://www.honga.net/totalwar/rome2/images/rome2/flags/3c_gallic_empire/mon_24.png)
![](https://www.honga.net/totalwar/rome2/images/rome2/flags/3c_alemanni/mon_24.png)
![](https://www.honga.net/totalwar/rome2/images/rome2/flags/marcomanni/mon_24.png)
![](https://www.honga.net/totalwar/rome2/images/rome2/flags/quadi/mon_24.png)
![](https://www.honga.net/totalwar/rome2/images/rome2/flags/3c_hispania/mon_24.png)
![](https://www.honga.net/totalwar/rome2/images/rome2/flags/3c_roman_empire_2/mon_24.png)
![](https://www.honga.net/totalwar/rome2/images/rome2/flags/rome_civil_war/mon_24.png)
![](https://www.honga.net/totalwar/rome2/images/rome2/flags/3c_palmyrene_empire/mon_24.png)
![](https://www.honga.net/totalwar/rome2/images/rome2/flags/rome_civil_war/mon_24.png)
![](https://www.honga.net/totalwar/rome2/images/rome2/flags/3c_egypt/mon_24.png)
![](https://www.honga.net/totalwar/rome2/images/rome2/flags/nasamones/mon_24.png)
![](https://www.honga.net/totalwar/rome2/images/rome2/flags/3c_roman_empire_2/mon_24.png)
![](https://www.honga.net/totalwar/rome2/images/rome2/flags/3c_egypt/mon_24.png)
![](https://www.honga.net/totalwar/rome2/images/rome2/flags/3c_vandali/mon_24.png)
![](https://www.honga.net/totalwar/rome2/images/rome2/flags/buri/mon_24.png)
![](https://www.honga.net/totalwar/rome2/images/rome2/flags/nahanarvali/mon_24.png)
![](https://www.honga.net/totalwar/rome2/images/rome2/flags/3c_lusitania/mon_24.png)
![](https://www.honga.net/totalwar/rome2/images/rome2/flags/3c_roman_empire_2/mon_24.png)
![](https://www.honga.net/totalwar/rome2/images/rome2/flags/3c_franci/mon_24.png)
![](https://www.honga.net/totalwar/rome2/images/rome2/flags/3c_saxons/mon_24.png)
![](https://www.honga.net/totalwar/rome2/images/rome2/flags/3c_langobardi/mon_24.png)
![](https://www.honga.net/totalwar/rome2/images/rome2/flags/mauri/mon_24.png)
![](https://www.honga.net/totalwar/rome2/images/rome2/flags/3c_mauretania/mon_24.png)
![](https://www.honga.net/totalwar/rome2/images/rome2/flags/3c_sassanid/mon_24.png)
![](https://www.honga.net/totalwar/rome2/images/rome2/flags/media%20atropatene/mon_24.png)
![](https://www.honga.net/totalwar/rome2/images/rome2/flags/3c_sassanid/mon_24.png)
![](https://www.honga.net/totalwar/rome2/images/rome2/flags/3c_palmyrene_empire/mon_24.png)
![](https://www.honga.net/totalwar/rome2/images/rome2/flags/3c_sassanid/mon_24.png)
![](https://www.honga.net/totalwar/rome2/images/rome2/flags/nabatea/mon_24.png)
![](https://www.honga.net/totalwar/rome2/images/rome2/flags/3c_palmyrene_empire/mon_24.png)
![](https://www.honga.net/totalwar/rome2/images/rome2/flags/3c_gallic_empire/mon_24.png)
![](https://www.honga.net/totalwar/rome2/images/rome2/flags/3c_numidia/mon_24.png)
![](https://www.honga.net/totalwar/rome2/images/rome2/flags/3c_palmyrene_empire/mon_24.png)
![](https://www.honga.net/totalwar/rome2/images/rome2/flags/3c_roman_empire_2/mon_24.png)
![](https://www.honga.net/totalwar/rome2/images/rome2/flags/3c_sassanid/mon_24.png)
![](https://www.honga.net/totalwar/rome2/images/rome2/flags/garamantia/mon_24.png)
![](https://www.honga.net/totalwar/rome2/images/rome2/flags/3c_caledones/mon_24.png)
![](https://www.honga.net/totalwar/rome2/images/rome2/flags/3c_ebdani/mon_24.png)
![](https://www.honga.net/totalwar/rome2/images/rome2/flags/3c_britannia/mon_24.png)
![](https://www.honga.net/totalwar/rome2/images/rome2/flags/3c_gallic_empire/mon_24.png)
![](https://www.honga.net/totalwar/rome2/images/rome2/flags/3c_roman_empire_2/mon_24.png)
![](https://www.honga.net/totalwar/rome2/images/rome2/flags/3c_gallic_empire/mon_24.png)
![](https://www.honga.net/totalwar/rome2/images/rome2/flags/3c_gothic/mon_24.png)
![](https://www.honga.net/totalwar/rome2/images/rome2/flags/3c_heruli/mon_24.png)
![](https://www.honga.net/totalwar/rome2/images/rome2/flags/3c_alani/mon_24.png)
![](https://www.honga.net/totalwar/rome2/images/rome2/flags/thyssagetae/mon_24.png)
![](https://www.honga.net/totalwar/rome2/images/rome2/flags/3c_alani/mon_24.png)
![](https://www.honga.net/totalwar/rome2/images/rome2/flags/rome_civil_war/mon_24.png)
![](https://www.honga.net/totalwar/rome2/images/rome2/flags/suebi/mon_24.png)
![](https://www.honga.net/totalwar/rome2/images/rome2/flags/rugii/mon_24.png)
![](https://www.honga.net/totalwar/rome2/images/rome2/flags/3c_burgundii/mon_24.png)
![](https://www.honga.net/totalwar/rome2/images/rome2/flags/3c_varini/mon_24.png)
![](https://www.honga.net/totalwar/rome2/images/rome2/flags/3c_palmyrene_empire/mon_24.png)
![](https://www.honga.net/totalwar/rome2/images/rome2/flags/3c_hispania/mon_24.png)
![](https://www.honga.net/totalwar/rome2/images/rome2/flags/3c_lusitania/mon_24.png)
![](https://www.honga.net/totalwar/rome2/images/rome2/flags/3c_hispania/mon_24.png)
![](https://www.honga.net/totalwar/rome2/images/rome2/flags/3c_roman_empire_2/mon_24.png)
![](https://www.honga.net/totalwar/rome2/images/rome2/flags/3c_kwarezm/mon_24.png)
![](https://www.honga.net/totalwar/rome2/images/rome2/flags/3c_baktria/mon_24.png)
![](https://www.honga.net/totalwar/rome2/images/rome2/flags/egypt/mon_24.png)
![](https://www.honga.net/totalwar/rome2/images/rome2/flags/libya/mon_24.png)
![](https://www.honga.net/totalwar/rome2/images/rome2/flags/carthage/mon_24.png)
![](https://www.honga.net/totalwar/rome2/images/rome2/flags/axum/mon_24.png)
![](https://www.honga.net/totalwar/rome2/images/rome2/flags/meroe_civil_war/mon_24.png)
![](https://www.honga.net/totalwar/rome2/images/rome2/flags/blemmyes/mon_24.png)
![](https://www.honga.net/totalwar/rome2/images/rome2/flags/vivisci/mon_24.png)
![](https://www.honga.net/totalwar/rome2/images/rome2/flags/arverni/mon_24.png)
![](https://www.honga.net/totalwar/rome2/images/rome2/flags/pictones/mon_24.png)
![](https://www.honga.net/totalwar/rome2/images/rome2/flags/himyar/mon_24.png)
![](https://www.honga.net/totalwar/rome2/images/rome2/flags/mascat/mon_24.png)
![](https://www.honga.net/totalwar/rome2/images/rome2/flags/saba/mon_24.png)
![](https://www.honga.net/totalwar/rome2/images/rome2/flags/gerrhaea/mon_24.png)
![](https://www.honga.net/totalwar/rome2/images/rome2/flags/qidri/mon_24.png)
![](https://www.honga.net/totalwar/rome2/images/rome2/flags/ma'in/mon_24.png)
![](https://www.honga.net/totalwar/rome2/images/rome2/flags/arachosia/mon_24.png)
![](https://www.honga.net/totalwar/rome2/images/rome2/flags/aria/mon_24.png)
![](https://www.honga.net/totalwar/rome2/images/rome2/flags/sagartia/mon_24.png)
![](https://www.honga.net/totalwar/rome2/images/rome2/flags/aria/mon_24.png)
![](https://www.honga.net/totalwar/rome2/images/rome2/flags/armenia/mon_24.png)
![](https://www.honga.net/totalwar/rome2/images/rome2/flags/sardes/mon_24.png)
![](https://www.honga.net/totalwar/rome2/images/rome2/flags/pergamon/mon_24.png)
![](https://www.honga.net/totalwar/rome2/images/rome2/flags/sardes/mon_24.png)
![](https://www.honga.net/totalwar/rome2/images/rome2/flags/rhodos/mon_24.png)
![](https://www.honga.net/totalwar/rome2/images/rome2/flags/baktria/mon_24.png)
![](https://www.honga.net/totalwar/rome2/images/rome2/flags/turdetani/mon_24.png)
![](https://www.honga.net/totalwar/rome2/images/rome2/flags/nova%20carthago/mon_24.png)
![](https://www.honga.net/totalwar/rome2/images/rome2/flags/treverii/mon_24.png)
![](https://www.honga.net/totalwar/rome2/images/rome2/flags/atrebartes/mon_24.png)
![](https://www.honga.net/totalwar/rome2/images/rome2/flags/bithynia/mon_24.png)
![](https://www.honga.net/totalwar/rome2/images/rome2/flags/pontus/mon_24.png)
![](https://www.honga.net/totalwar/rome2/images/rome2/flags/trapezos/mon_24.png)
![](https://www.honga.net/totalwar/rome2/images/rome2/flags/cimmeria/mon_24.png)
![](https://www.honga.net/totalwar/rome2/images/rome2/flags/brigantes/mon_24.png)
![](https://www.honga.net/totalwar/rome2/images/rome2/flags/iceni/mon_24.png)
![](https://www.honga.net/totalwar/rome2/images/rome2/flags/demetae/mon_24.png)
![](https://www.honga.net/totalwar/rome2/images/rome2/flags/dumnonii/mon_24.png)
![](https://www.honga.net/totalwar/rome2/images/rome2/flags/caledones/mon_24.png)
![](https://www.honga.net/totalwar/rome2/images/rome2/flags/ebdani/mon_24.png)
![](https://www.honga.net/totalwar/rome2/images/rome2/flags/sagartia/mon_24.png)
![](https://www.honga.net/totalwar/rome2/images/rome2/flags/drangiana/mon_24.png)
![](https://www.honga.net/totalwar/rome2/images/rome2/flags/carthage/mon_24.png)
![](https://www.honga.net/totalwar/rome2/images/rome2/flags/arevaci/mon_24.png)
![](https://www.honga.net/totalwar/rome2/images/rome2/flags/edetani/mon_24.png)
![](https://www.honga.net/totalwar/rome2/images/rome2/flags/ardhan/mon_24.png)
![](https://www.honga.net/totalwar/rome2/images/rome2/flags/colchis/mon_24.png)
![](https://www.honga.net/totalwar/rome2/images/rome2/flags/kartli/mon_24.png)
![](https://www.honga.net/totalwar/rome2/images/rome2/flags/namnetes/mon_24.png)
![](https://www.honga.net/totalwar/rome2/images/rome2/flags/aedui/mon_24.png)
![](https://www.honga.net/totalwar/rome2/images/rome2/flags/carnutes/mon_24.png)
![](https://www.honga.net/totalwar/rome2/images/rome2/flags/khorasmii/mon_24.png)
![](https://www.honga.net/totalwar/rome2/images/rome2/flags/dahae/mon_24.png)
![](https://www.honga.net/totalwar/rome2/images/rome2/flags/seleucid/mon_24.png)
![](https://www.honga.net/totalwar/rome2/images/rome2/flags/cyprus/mon_24.png)
![](https://www.honga.net/totalwar/rome2/images/rome2/flags/insubres/mon_24.png)
![](https://www.honga.net/totalwar/rome2/images/rome2/flags/liguria/mon_24.png)
![](https://www.honga.net/totalwar/rome2/images/rome2/flags/veneti/mon_24.png)
![](https://www.honga.net/totalwar/rome2/images/rome2/flags/etruscan%20league/mon_24.png)
![](https://www.honga.net/totalwar/rome2/images/rome2/flags/carthage/mon_24.png)
![](https://www.honga.net/totalwar/rome2/images/rome2/flags/bastarnae/mon_24.png)
![](https://www.honga.net/totalwar/rome2/images/rome2/flags/getae/mon_24.png)
![](https://www.honga.net/totalwar/rome2/images/rome2/flags/biephi/mon_24.png)
![](https://www.honga.net/totalwar/rome2/images/rome2/flags/cappadocia/mon_24.png)
![](https://www.honga.net/totalwar/rome2/images/rome2/flags/galatia/mon_24.png)
![](https://www.honga.net/totalwar/rome2/images/rome2/flags/sardes/mon_24.png)
![](https://www.honga.net/totalwar/rome2/images/rome2/flags/drangiana/mon_24.png)
![](https://www.honga.net/totalwar/rome2/images/rome2/flags/nervii/mon_24.png)
![](https://www.honga.net/totalwar/rome2/images/rome2/flags/sequani/mon_24.png)
![](https://www.honga.net/totalwar/rome2/images/rome2/flags/athens/mon_24.png)
![](https://www.honga.net/totalwar/rome2/images/rome2/flags/knossos/mon_24.png)
![](https://www.honga.net/totalwar/rome2/images/rome2/flags/sparta/mon_24.png)
![](https://www.honga.net/totalwar/rome2/images/rome2/flags/boii/mon_24.png)
![](https://www.honga.net/totalwar/rome2/images/rome2/flags/daorsi/mon_24.png)
![](https://www.honga.net/totalwar/rome2/images/rome2/flags/ardiaei/mon_24.png)
![](https://www.honga.net/totalwar/rome2/images/rome2/flags/delmatae/mon_24.png)
![](https://www.honga.net/totalwar/rome2/images/rome2/flags/etruscan%20league/mon_24.png)
![](https://www.honga.net/totalwar/rome2/images/rome2/flags/rome/mon_24.png)
![](https://www.honga.net/totalwar/rome2/images/rome2/flags/etruscan%20league/mon_24.png)
![](https://www.honga.net/totalwar/rome2/images/rome2/flags/rome/mon_24.png)
![](https://www.honga.net/totalwar/rome2/images/rome2/flags/cyrenaica/mon_24.png)
![](https://www.honga.net/totalwar/rome2/images/rome2/flags/nasamones/mon_24.png)
![](https://www.honga.net/totalwar/rome2/images/rome2/flags/cyrenaica/mon_24.png)
![](https://www.honga.net/totalwar/rome2/images/rome2/flags/celtici/mon_24.png)
![](https://www.honga.net/totalwar/rome2/images/rome2/flags/lusitani/mon_24.png)
![](https://www.honga.net/totalwar/rome2/images/rome2/flags/epirus/mon_24.png)
![](https://www.honga.net/totalwar/rome2/images/rome2/flags/macedon/mon_24.png)
![](https://www.honga.net/totalwar/rome2/images/rome2/flags/epirus/mon_24.png)
![](https://www.honga.net/totalwar/rome2/images/rome2/flags/frisii/mon_24.png)
![](https://www.honga.net/totalwar/rome2/images/rome2/flags/cherusci/mon_24.png)
![](https://www.honga.net/totalwar/rome2/images/rome2/flags/marcomanni/mon_24.png)
![](https://www.honga.net/totalwar/rome2/images/rome2/flags/rome/mon_24.png)
![](https://www.honga.net/totalwar/rome2/images/rome2/flags/carthage/mon_24.png)
![](https://www.honga.net/totalwar/rome2/images/rome2/flags/syracuse/mon_24.png)
![](https://www.honga.net/totalwar/rome2/images/rome2/flags/gaetuli/mon_24.png)
![](https://www.honga.net/totalwar/rome2/images/rome2/flags/masaesyli/mon_24.png)
![](https://www.honga.net/totalwar/rome2/images/rome2/flags/nova%20carthago/mon_24.png)
![](https://www.honga.net/totalwar/rome2/images/rome2/flags/media%20atropatene/mon_24.png)
![](https://www.honga.net/totalwar/rome2/images/rome2/flags/persia/mon_24.png)
![](https://www.honga.net/totalwar/rome2/images/rome2/flags/media/mon_24.png)
![](https://www.honga.net/totalwar/rome2/images/rome2/flags/seleucid/mon_24.png)
![](https://www.honga.net/totalwar/rome2/images/rome2/flags/nabatea/mon_24.png)
![](https://www.honga.net/totalwar/rome2/images/rome2/flags/egypt/mon_24.png)
![](https://www.honga.net/totalwar/rome2/images/rome2/flags/nabatea/mon_24.png)
![](https://www.honga.net/totalwar/rome2/images/rome2/flags/scordisci/mon_24.png)
![](https://www.honga.net/totalwar/rome2/images/rome2/flags/breuci/mon_24.png)
![](https://www.honga.net/totalwar/rome2/images/rome2/flags/eravisci/mon_24.png)
![](https://www.honga.net/totalwar/rome2/images/rome2/flags/parthia/mon_24.png)
![](https://www.honga.net/totalwar/rome2/images/rome2/flags/parthava/mon_24.png)
![](https://www.honga.net/totalwar/rome2/images/rome2/flags/persia/mon_24.png)
![](https://www.honga.net/totalwar/rome2/images/rome2/flags/garamantia/mon_24.png)
![](https://www.honga.net/totalwar/rome2/images/rome2/flags/royal%20scythia/mon_24.png)
![](https://www.honga.net/totalwar/rome2/images/rome2/flags/aorsoi/mon_24.png)
![](https://www.honga.net/totalwar/rome2/images/rome2/flags/catiaroi/mon_24.png)
![](https://www.honga.net/totalwar/rome2/images/rome2/flags/siraces/mon_24.png)
![](https://www.honga.net/totalwar/rome2/images/rome2/flags/volcae/mon_24.png)
![](https://www.honga.net/totalwar/rome2/images/rome2/flags/massilia/mon_24.png)
![](https://www.honga.net/totalwar/rome2/images/rome2/flags/helvetii/mon_24.png)
![](https://www.honga.net/totalwar/rome2/images/rome2/flags/nori/mon_24.png)
![](https://www.honga.net/totalwar/rome2/images/rome2/flags/raeti/mon_24.png)
![](https://www.honga.net/totalwar/rome2/images/rome2/flags/aestii/mon_24.png)
![](https://www.honga.net/totalwar/rome2/images/rome2/flags/anartes/mon_24.png)
![](https://www.honga.net/totalwar/rome2/images/rome2/flags/budini/mon_24.png)
![](https://www.honga.net/totalwar/rome2/images/rome2/flags/roxolani/mon_24.png)
![](https://www.honga.net/totalwar/rome2/images/rome2/flags/thyssagetae/mon_24.png)
![](https://www.honga.net/totalwar/rome2/images/rome2/flags/massagetae/mon_24.png)
![](https://www.honga.net/totalwar/rome2/images/rome2/flags/lugii/mon_24.png)
![](https://www.honga.net/totalwar/rome2/images/rome2/flags/gutones/mon_24.png)
![](https://www.honga.net/totalwar/rome2/images/rome2/flags/cimbri/mon_24.png)
![](https://www.honga.net/totalwar/rome2/images/rome2/flags/suebi/mon_24.png)
![](https://www.honga.net/totalwar/rome2/images/rome2/flags/rugii/mon_24.png)
![](https://www.honga.net/totalwar/rome2/images/rome2/flags/seleucid/mon_24.png)
![](https://www.honga.net/totalwar/rome2/images/rome2/flags/galleaci/mon_24.png)
![](https://www.honga.net/totalwar/rome2/images/rome2/flags/cantabri/mon_24.png)
![](https://www.honga.net/totalwar/rome2/images/rome2/flags/cessetani/mon_24.png)
![](https://www.honga.net/totalwar/rome2/images/rome2/flags/tylis/mon_24.png)
![](https://www.honga.net/totalwar/rome2/images/rome2/flags/triballi/mon_24.png)
![](https://www.honga.net/totalwar/rome2/images/rome2/flags/odryssian%20kingdom/mon_24.png)
![](https://www.honga.net/totalwar/rome2/images/rome2/flags/macedon/mon_24.png)
![](https://www.honga.net/totalwar/rome2/images/rome2/flags/baktria/mon_24.png)