

 English
 Français
 Italiano
 Español
 Русский
 Čeština
 Polski
 Türkçe
 Português (Brasil)
 한국어
한국어 简体中文
简体中文 正體中文
正體中文Deckwerfer
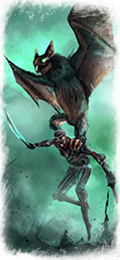
Die abscheuliche Kombination aus einer Vampirfledermaus und einem Zombie mit einer Schusswaffe schafft einen grausigen, fliegenden Schrecken.Bei einem Angriff von untoten Piratenflotten auf dem offenen Ozean sehen ihre Opfer für gewöhnlich zuerst die fliegenden Grauen, die unter dem Namen Deckwerfer berüchtigt sind und Kugeln auf die Feinde ihrer Herren herabregnen lassen. Ein Deckwerfer besteht aus einer blutdurstigen Vampirfledermaus und einem Zombie-„Reiter“ mit einer Schusswaffe, genauer gesagt, einem Zombie, der unwissentlich und etwas desorientiert an den Krallen der Vampirfledermaus hängt, aber dennoch die nötige Fähigkeit besitzt, um seine Handkanone abzufeuern. Vor einem Angriff schlafen die Vampirfledermäuse an den obersten Spieren der untoten Flottentakelage, bis sie von der Erwartung auf den kupfrigen Blutgeruch in der Luft geweckt werden. Sie fliegen durch ihre Reihen, schnappen sich einen Zombie und stürzen sich in das Schlachtgetümmel, während ihre Passagiere die verbesserte Aussicht nutzen, um Salven in die Gruppen des Feindes hinabzuschießen.
 |
Unit Name Deckwerfer |
Main Unit Key wh2_dlc11_cst_cav_deck_droppers_0 |
Land Unit Key wh2_dlc11_cst_cav_deck_droppers_0 |
Naval Unit Key wh_main_shp_transport |
Land Unit Group |
Naval Unit Group |
Soldiers 24 |
Caste Bestie |
Category Kavallerie |
Class Geschosskavallerie |
Kosten 450 |
Rekrutierungskosten 450 |
Unterhaltskosten 80 |
Missile Damage 30 |
├ Missile Weapon wh2_dlc11_cst_deck_dropper_pistol |
├ Projectile wh2_dlc11_cst_pistol_deck_dropper_bullet |
├ Missile Damage 24 |
├ Missile Ap Damage 6 |
└ Base Reload Time 9 |
Accuracy 10 |
Range 80 |
Reload 10 |
Shots Per Minute 7.4 |
Ammunition 20 |
Melee Attack 26 |
Weapon Strength (Weapon Damage) 22 |
├ Melee Weapon wh_main_vmp_fell_bats |
├ Melee Damage Base 20 |
├ Melee Damage Ap 2 |
├ Armour Piercing No |
├ Bonus vs Cavalry 0 |
├ Bonus vs Elephants 0 |
└ Bonus vs Infantry 0 |
Charge Bonus 16 |
Melee Defence 22 |
├ Base Defence 22 |
├ Shield none |
└ Shield Defence 0 |
Armour 15 |
├ Armour wh2_main_leather_15 |
├ Armour Defence 15 |
└ Shield Armour 0 |
Health 184 |
├ Man Entity wh_main_infantry_zombie_blood_dismembers |
├ Man Speed 23 |
├ Man Health 8 |
├ Bonus Hit Points 168 |
├ Mount wh2_dlc11_cst_mon_deck_dropper_bat |
├ Mount Entity wh2_dlc11_cst_mon_deck_dropper_bat |
├ Mount Speed 48 |
└ Mount Health 8 |
Leadership (Base Morale) 40 |
Fähigkeiten
- Extrapulver
Denn man kann niemals zu viel haben. - Zerfallen
Die Toten der Alten Welt ruhen nicht sanft. Wer von Vampiren und Nekromanten herbeibeschworen wird, hat seine sterblichen Sorgen hinter sich gelassen - nur der Wille des Meisters gilt. - Aufgelöst
Die Dunkle Magiebindung ist gescheitert. Fleisch und nekromantische Energie gleiten von den Opfern ab und hinterlassen nichts als Staub.
Attributes
- Erzeugt Angst
Diese Einheit macht allen feindlichen Einheiten Angst und reduziert ihre Führerschaft, wenn sie in der Nähe sind. Sie ist außerdem immun gegen Angst. Angst-Strafen häufen sich nicht an. - In Bewegung schießen
Diese Einheit kann unterwegs feuern. - {{tr:wh2_dlc09_undead_description}}
Stärken & Schwächen
- Spezialfernkampfwaffe
Diese Einheit hat einen speziellen Geschossangriff mit begrenzter Munition, der zum Einleiten eines Angriffs sehr nützlich sein kann. - In Bewegung schießen
Diese Einheit kann unterwegs feuern.
| Benötigt Gebäude | |
|---|---|
|
Schlafende Bäume
(wh2_dlc11_vampirecoast_military_flying_2) Level 1
Höhle der fliegenden Schrecken
(wh2_dlc11_vampirecoast_military_flying_3) Level 2
Riesenfutterhöhle
(wh2_dlc11_vampirecoast_military_flying_4) Level 3
Ausguckgabel
(wh2_dlc11_vampirecoast_ship_crows_nest_2) Level 1
Ausguck
(wh2_dlc11_vampirecoast_ship_crows_nest_3) Level 2
Krähennest
(wh2_dlc11_vampirecoast_ship_crows_nest_4) Level 3 |
|
| Garnison Gebäude | |
|---|---|
|
Slums der Verfluchten
(wh2_dlc11_cst_outpostnorsca_major_1) Level 1
Küste der Verfluchten
(wh2_dlc11_cst_outpostnorsca_major_1_coast) Level 1
Elende Geisterstadt
(wh2_dlc11_cst_outpostnorsca_major_2) Level 2
Geisterhütten
(wh2_dlc11_cst_outpostnorsca_major_2_coast) Level 2
Schlupfwinkel der toten Piraten
(wh2_dlc11_cst_outpostnorsca_major_3) Level 3
Versteck der toten Piraten
(wh2_dlc11_cst_outpostnorsca_major_3_coast) Level 3
Ghetto der Verfluchten
(wh2_dlc11_cst_outpostnorsca_minor_1) Level 1
Küstenlinie der Verfluchten
(wh2_dlc11_cst_outpostnorsca_minor_1_coast) Level 1
Geisterschuppen
(wh2_dlc11_cst_outpostnorsca_minor_2) Level 2
Geisterhütten
(wh2_dlc11_cst_outpostnorsca_minor_2_coast) Level 2
Weiler der toten Piraten
(wh2_dlc11_cst_outpostnorsca_minor_3) Level 3
Zuflucht der toten Piraten
(wh2_dlc11_cst_outpostnorsca_minor_3_coast) Level 3
Zombie-Aussichtsposten
(wh2_dlc11_vampirecoast_defence_garrison_1) Level 0
Palisaden
(wh2_dlc11_vampirecoast_defence_norsca_1) Level 0
Slums der Verfluchten
(wh2_dlc11_vampirecoast_settlement_major_1) Level 1
Elende Geisterstadt
(wh2_dlc11_vampirecoast_settlement_major_2) Level 2
Schlupfwinkel der toten Piraten
(wh2_dlc11_vampirecoast_settlement_major_3) Level 3
Küste der Verfluchten
(wh2_dlc11_vampirecoast_settlement_major_coast_1) Level 1
Geisterhütten
(wh2_dlc11_vampirecoast_settlement_major_coast_2) Level 2
Versteck der toten Piraten
(wh2_dlc11_vampirecoast_settlement_major_coast_3) Level 3
Ghetto der Verfluchten
(wh2_dlc11_vampirecoast_settlement_minor_1) Level 1
Geisterschuppen
(wh2_dlc11_vampirecoast_settlement_minor_2) Level 2
Weiler der toten Piraten
(wh2_dlc11_vampirecoast_settlement_minor_3) Level 3
Küstenlinie der Verfluchten
(wh2_dlc11_vampirecoast_settlement_minor_coast_1) Level 1
Geisterhütten
(wh2_dlc11_vampirecoast_settlement_minor_coast_2) Level 2
Zuflucht der toten Piraten
(wh2_dlc11_vampirecoast_settlement_minor_coast_3) Level 3
Besetztes Orkmassiv (Stufe 1)
(wh2_dlc15_special_settlement_massif_orcal_cst_1) Level 1
Besetztes Orkmassiv (Stufe 2)
(wh2_dlc15_special_settlement_massif_orcal_cst_2) Level 2
Besetztes Orkmassiv (Stufe 3)
(wh2_dlc15_special_settlement_massif_orcal_cst_3) Level 3
Besetztes Tor Yvresse (Stufe 1)
(wh2_dlc15_special_settlement_tor_yvresse_cst_1) Level 1
Besetztes Tor Yvresse (Stufe 2)
(wh2_dlc15_special_settlement_tor_yvresse_cst_2) Level 2
Besetztes Tor Yvresse (Stufe 3)
(wh2_dlc15_special_settlement_tor_yvresse_cst_3) Level 3
Besetztes Altdorf (Stufe 1)
(wh2_main_special_settlement_altdorf_cst_1) Level 1
Besetztes Altdorf (Stufe 2)
(wh2_main_special_settlement_altdorf_cst_2) Level 2
Besetztes Altdorf (Stufe 3)
(wh2_main_special_settlement_altdorf_cst_3) Level 3
Waldposten (Slum)
(wh2_main_special_settlement_athel_loren_cst_1) Level 1
Waldposten (Baracken)
(wh2_main_special_settlement_athel_loren_cst_2) Level 2
Waldposten (Schlupfwinkel)
(wh2_main_special_settlement_athel_loren_cst_3) Level 3
Besetztes Schwarzfels (Stufe 1)
(wh2_main_special_settlement_black_crag_cst_1) Level 1
Besetztes Schwarzfels (Stufe 2)
(wh2_main_special_settlement_black_crag_cst_2) Level 2
Besetztes Schwarzfels (Stufe 3)
(wh2_main_special_settlement_black_crag_cst_3) Level 3
Kleine besetzte Elfenkolonie
(wh2_main_special_settlement_colony_major_other_2) Level 2
Besetzte Elfenkolonie
(wh2_main_special_settlement_colony_major_other_3) Level 3
Kleine besetzte Elfenkolonie
(wh2_main_special_settlement_colony_minor_other_2) Level 2
Besetzte Elfenkolonie
(wh2_main_special_settlement_colony_minor_other_3) Level 3
Besetztes Couronne (Stufe 1)
(wh2_main_special_settlement_couronne_cst_1) Level 1
Besetztes Couronne (Stufe 2)
(wh2_main_special_settlement_couronne_cst_2) Level 2
Besetztes Couronne (Stufe 3)
(wh2_main_special_settlement_couronne_cst_3) Level 3
Besetztes Drakenhof (Stufe 1)
(wh2_main_special_settlement_drakenhof_cst_1) Level 1
Besetztes Drakenhof (Stufe 2)
(wh2_main_special_settlement_drakenhof_cst_2) Level 2
Besetztes Drakenhof (Stufe 3)
(wh2_main_special_settlement_drakenhof_cst_3) Level 3
Besetztes Karak Achtgipfel (Stufe 1)
(wh2_main_special_settlement_eight_peaks_cst_1) Level 1
Besetztes Karak Achtgipfel (Stufe 2)
(wh2_main_special_settlement_eight_peaks_cst_2) Level 2
Besetztes Karak Achtgipfel (Stufe 3)
(wh2_main_special_settlement_eight_peaks_cst_3) Level 3
Besetztes Gaental (Stufe 1)
(wh2_main_special_settlement_gaean_vale_cst_1) Level 1
Besetztes Gaental (Stufe 2)
(wh2_main_special_settlement_gaean_vale_cst_2) Level 2
Besetztes Gaental (Stufe 3)
(wh2_main_special_settlement_gaean_vale_cst_3) Level 3
Besetzte Höllengrube (Stufe 1)
(wh2_main_special_settlement_hellpit_cst_1) Level 1
Besetzte Höllengrube (Stufe 2)
(wh2_main_special_settlement_hellpit_cst_2) Level 2
Besetzte Höllengrube (Stufe 3)
(wh2_main_special_settlement_hellpit_cst_3) Level 3
Besetztes Hexoatl (Stufe 1)
(wh2_main_special_settlement_hexoatl_cst_1) Level 1
Besetztes Hexoatl (Stufe 2)
(wh2_main_special_settlement_hexoatl_cst_2) Level 2
Besetztes Hexoatl (Stufe 3)
(wh2_main_special_settlement_hexoatl_cst_3) Level 3
Besetztes Itza (Stufe 1)
(wh2_main_special_settlement_itza_cst_1) Level 1
Besetztes Itza (Stufe 2)
(wh2_main_special_settlement_itza_cst_2) Level 2
Besetztes Itza (Stufe 3)
(wh2_main_special_settlement_itza_cst_3) Level 3
Besetztes Karaz-A-Karak (Stufe 1)
(wh2_main_special_settlement_karaz_a_karak_cst_1) Level 1
Besetztes Karaz-A-Karak (Stufe 2)
(wh2_main_special_settlement_karaz_a_karak_cst_2) Level 2
Besetztes Karaz-A-Karak (Stufe 3)
(wh2_main_special_settlement_karaz_a_karak_cst_3) Level 3
Besetztes Khemri (Stufe 1)
(wh2_main_special_settlement_khemri_cst_1) Level 1
Besetztes Khemri (Stufe 2)
(wh2_main_special_settlement_khemri_cst_2) Level 2
Besetztes Khemri (Stufe 3)
(wh2_main_special_settlement_khemri_cst_3) Level 3
Besetztes Kislev (Stufe 1)
(wh2_main_special_settlement_kislev_cst_1) Level 1
Besetztes Kislev (Stufe 2)
(wh2_main_special_settlement_kislev_cst_2) Level 2
Besetztes Kislev (Stufe 3)
(wh2_main_special_settlement_kislev_cst_3) Level 3
Besetztes Konquata (Stufe 1)
(wh2_main_special_settlement_konquata_cst_1) Level 1
Besetztes Konquata (Stufe 2)
(wh2_main_special_settlement_konquata_cst_2) Level 2
Besetztes Konquata (Stufe 3)
(wh2_main_special_settlement_konquata_cst_3) Level 3
Besetztes Lahmia (Stufe 1)
(wh2_main_special_settlement_lahmia_cst_1) Level 1
Besetztes Lahmia (Stufe 2)
(wh2_main_special_settlement_lahmia_cst_2) Level 2
Besetztes Lahmia (Stufe 3)
(wh2_main_special_settlement_lahmia_cst_3) Level 3
Besetztes Lothern (Stufe 1)
(wh2_main_special_settlement_lothern_cst_1) Level 1
Besetztes Lothern (Stufe 2)
(wh2_main_special_settlement_lothern_cst_2) Level 2
Besetztes Lothern (Stufe 3)
(wh2_main_special_settlement_lothern_cst_3) Level 3
Besetztes Miragliano (Stufe 1)
(wh2_main_special_settlement_miragliano_cst_1) Level 1
Besetztes Miragliano (Stufe 2)
(wh2_main_special_settlement_miragliano_cst_2) Level 2
Besetztes Miragliano (Stufe 3)
(wh2_main_special_settlement_miragliano_cst_3) Level 3
Besetztes Naggarond (Stufe 1)
(wh2_main_special_settlement_naggarond_cst_1) Level 1
Besetztes Naggarond (Stufe 2)
(wh2_main_special_settlement_naggarond_cst_2) Level 2
Besetztes Naggarond (Stufe 3)
(wh2_main_special_settlement_naggarond_cst_3) Level 3
Pyramide des Nagash (Slum)
(wh2_main_special_settlement_pyramid_of_nagash_cst_1) Level 1
Pyramide des Nagash (Baracken)
(wh2_main_special_settlement_pyramid_of_nagash_cst_2) Level 2
Pyramide des Nagash (Schlupfwinkel)
(wh2_main_special_settlement_pyramid_of_nagash_cst_3) Level 3
Besetztes Skavenblight (Stufe 1)
(wh2_main_special_settlement_skavenblight_cst_1) Level 1
Besetztes Skavenblight (Stufe 2)
(wh2_main_special_settlement_skavenblight_cst_2) Level 2
Besetztes Skavenblight (Stufe 3)
(wh2_main_special_settlement_skavenblight_cst_3) Level 3 |
|
|
Große besetzte Elfenkolonie
(wh2_main_special_settlement_colony_major_other_4) Level 4
Blühende besetzte Elfenkolonie
(wh2_main_special_settlement_colony_major_other_5) Level 5 |
|
| Fraktionsverfügbarkeit | |
|---|---|
| Das Auge des Mahlstroms | |
| Total War: WARHAMMER II |
|---|
|
Total War: WARHAMMER II |
| Fraktionen |
| Einheiten |
| Gebäude |
| Technologie |
| Fähigkeiten |
| Armeen |
| Vergleichen Einheiten |
| Vampirküste Einheiten |
|---|
| Kommando (3) |
| Nahkampfinfanterie (13) |
13. |
| Geschossinfanterie (7) |
20. |
| Geschosskavallerie (3) |
24. |
| Feldartillerie (2) |
27. |
28. |
Factions
Units
Units in Custom Battle
Buildings
Technologies
Household
Regions
Mercenaries
Total War: Rome II
Factions
Units
Auxiliary Corps
Units in Custom Battle
Buildings
Technologies
Household
Regions
Mercenaries
Total War: Rome II: MODs
Radious Total War Mod
Divide et Impera
Total War: Rome II: ICONs
BullGod's Unit Icons
Normal's Rome II_Units Icons
Factions
Units
Shogun 2: Rise of the Samurai
Shogun 2: Fall of the Samurai
Napoleon: Total War
Factions
Units
Empire: Total War
Factions
Units
Factions
Units
Army
Buildings
Mercenaries
Retinue
Traits
Regions
Ranking
Medieval II: Total War: Kingdoms
Medieval II - Americas
Medieval II - Britannia
Medieval II - Crusades
Medieval II - Tutonic
Broken Crescent 1.05
Broken Crescent 2.02
Stainless Steel 5.1b
Stainless Steel 6.1
Deus Lo Vult 5.7
Deus Lo Vult 6.0
HTF: Eagle of the Elbe 05
The Long Road 2.0
Lands to Conquer Gold
DarthMod 1.4D: The Last Episode
Das Heilige Romische Reich 06
Third Age 1.3
Third Age 1.4
Third Age 2.1
Third Age 3.1