

 English
 Français
 Italiano
 Deutsch
 Español
 Русский
 Čeština
 Polski
 Türkçe
 Português (Brasil)
 简体中文
简体中文 正體中文
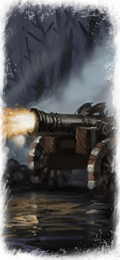
正體中文대구경 대포
제국의 표준이며 효율적인 대포는 침착하게 장갑 관통 철구를 적에게 포격합니다.제국 포병 학교의 대구경 대포는 제국의 적에겐 공포의 대상입니다. 이 우레와 같은 포격은 적진에 철구를 쏘아대며, 한 발 한 발이 밀집한 병단에 피 투성이 밭고랑을 일궈냅니다. 마스터 거너 품하르트 폰 슈타이어가 대포 한 발로 분노한 용의 목을 날려버린 미덴하임 공성전의 사례처럼 제 아무리 강한 피조물이라도 대구경 대포의 위력은 무시하지 못 합니다.
 |
Unit Name 대구경 대포 |
Main Unit Key wh_main_emp_art_great_cannon |
Land Unit Key wh_main_emp_art_great_cannon |
Naval Unit Key wh_main_shp_transport |
Land Unit Group |
Naval Unit Group |
Soldiers 44 |
Caste 병기 |
Category 공성 병기 |
Class 야전 포병 |
비용 800 |
모집 비용 800 |
유지비 200 |
Engine Missile Damage 440 |
├ Engine wh_main_emp_art_great_cannon |
├ Missile Weapon wh_main_emp_cannon |
├ Projectile wh_emp_great_cannon_ball |
├ Missile Damage 88 |
├ Missile Ap Damage 352 |
└ Base Reload Time 22 |
Accuracy 10 |
Range 450 |
Reload 10 |
Shots Per Minute 3 |
Ammunition 22 |
Melee Attack 10 |
Weapon Strength (Weapon Damage) 24 |
├ Melee Weapon wh_main_emp_sword_short |
├ Melee Damage Base 21 |
├ Melee Damage Ap 3 |
├ Armour Piercing No |
├ Bonus vs Cavalry 0 |
├ Bonus vs Elephants 0 |
└ Bonus vs Infantry 0 |
Charge Bonus 5 |
Melee Defence 6 |
├ Base Defence 6 |
├ Shield none |
└ Shield Defence 0 |
Armour 20 |
├ Armour wh2_main_leather_20 |
├ Armour Defence 20 |
└ Shield Armour 0 |
Health 56 |
├ Man Entity wh2_dlc16_infantry_standard_crew_blood_dismembers |
├ Man Speed 30 |
├ Man Health 8 |
└ Bonus Hit Points 48 |
Leadership (Base Morale) 50 |
능력
No Ability
Attributes
- 질주 불가
이 부대는 달릴 수 없고, 천천히만 이동합니다.
강점과 약점
- 사거리 우수
이 부대는 동급 대부분의 다른 부대보다 사정거리가 넓습니다. 이로 인해 적 사격 부대의 사정거리에 들어가기 전에 적을 해치울 수 있습니다. - 장갑 관통 사격
장갑 관통 무기가 가하는 피해는 갑옷 그 자체를 무시하기 때문에 중무장한 적을 상대할 때 이상적인 선택입니다. 하지만 무겁고 연사력이 낮은 경우가 많기 때문에 무장하지 못한 표적에게는 효율이 떨어집니다. - 대형 적에 효과적
대형 적 상대로 효과적인 부대는 최소 군마 이상의 크기인 표적을 상대할 때 유리합니다. 이점으로는 대형 표적에 대한 피해 보너스나 아주 작은 영역에 집중 공격 등이 있습니다. 하지만 일부 부대는 단순히 공격이 느려서 노련한 근접 전투원이 쉽게 피할 수 있기 때문에 대형 표적을 상대하는 게 더 좋기도 합니다.
| 요구사항 건물 | |
|---|---|
|
집결지
(wh2_main_horde_rogue_settlement_1) Level 0
군사 야영지
(wh2_main_horde_rogue_settlement_2) Level 1
점령된 소규모 정착지
(wh2_main_rogue_outpostnorsca_major_1) Level 1
점령된 정착지
(wh2_main_rogue_outpostnorsca_major_2) Level 2
점령된 대규모 정착지
(wh2_main_rogue_outpostnorsca_major_3) Level 3
점령된 소규모 정착지
(wh2_main_rogue_outpostnorsca_major_coast_1) Level 1
점령된 정착지
(wh2_main_rogue_outpostnorsca_major_coast_2) Level 2
점령된 대규모 정착지
(wh2_main_rogue_outpostnorsca_major_coast_3) Level 3
점령된 소규모 정착지
(wh2_main_rogue_outpostnorsca_minor_1) Level 1
점령된 정착지
(wh2_main_rogue_outpostnorsca_minor_2) Level 2
점령된 대규모 정착지
(wh2_main_rogue_outpostnorsca_minor_3) Level 3
점령된 소규모 정착지
(wh2_main_rogue_outpostnorsca_minor_coast_1) Level 1
점령된 정착지
(wh2_main_rogue_outpostnorsca_minor_coast_2) Level 2
점령된 대규모 정착지
(wh2_main_rogue_outpostnorsca_minor_coast_3) Level 3
점령된 소규모 정착지
(wh2_main_rogue_settlement_major_1) Level 1
점령된 정착지
(wh2_main_rogue_settlement_major_2) Level 2
점령된 대규모 정착지
(wh2_main_rogue_settlement_major_3) Level 3
점령된 소규모 정착지
(wh2_main_rogue_settlement_major_coast_1) Level 1
점령된 정착지
(wh2_main_rogue_settlement_major_coast_2) Level 2
점령된 대규모 정착지
(wh2_main_rogue_settlement_major_coast_3) Level 3
점령된 소규모 정착지
(wh2_main_rogue_settlement_minor_1) Level 1
점령된 정착지
(wh2_main_rogue_settlement_minor_2) Level 2
점령된 대규모 정착지
(wh2_main_rogue_settlement_minor_3) Level 3
점령된 소규모 정착지
(wh2_main_rogue_settlement_minor_coast_1) Level 1
점령된 정착지
(wh2_main_rogue_settlement_minor_coast_2) Level 2
점령된 대규모 정착지
(wh2_main_rogue_settlement_minor_coast_3) Level 3
숲 야영지
(wh2_main_special_settlement_athel_loren_rogue_1) Level 1 |
|
| 주둔군 건물 | |
|---|---|
|
점령된 소규모 정착지
(wh2_main_rogue_outpostnorsca_major_1) Level 1
점령된 정착지
(wh2_main_rogue_outpostnorsca_major_2) Level 2
점령된 대규모 정착지
(wh2_main_rogue_outpostnorsca_major_3) Level 3
점령된 소규모 정착지
(wh2_main_rogue_outpostnorsca_major_coast_1) Level 1
점령된 정착지
(wh2_main_rogue_outpostnorsca_major_coast_2) Level 2
점령된 대규모 정착지
(wh2_main_rogue_outpostnorsca_major_coast_3) Level 3
점령된 소규모 정착지
(wh2_main_rogue_outpostnorsca_minor_1) Level 1
점령된 정착지
(wh2_main_rogue_outpostnorsca_minor_2) Level 2
점령된 대규모 정착지
(wh2_main_rogue_outpostnorsca_minor_3) Level 3
점령된 소규모 정착지
(wh2_main_rogue_outpostnorsca_minor_coast_1) Level 1
점령된 정착지
(wh2_main_rogue_outpostnorsca_minor_coast_2) Level 2
점령된 대규모 정착지
(wh2_main_rogue_outpostnorsca_minor_coast_3) Level 3
점령된 소규모 정착지
(wh2_main_rogue_settlement_major_1) Level 1
점령된 정착지
(wh2_main_rogue_settlement_major_2) Level 2
점령된 대규모 정착지
(wh2_main_rogue_settlement_major_3) Level 3
점령된 소규모 정착지
(wh2_main_rogue_settlement_major_coast_1) Level 1
점령된 정착지
(wh2_main_rogue_settlement_major_coast_2) Level 2
점령된 대규모 정착지
(wh2_main_rogue_settlement_major_coast_3) Level 3
점령된 소규모 정착지
(wh2_main_rogue_settlement_minor_1) Level 1
점령된 정착지
(wh2_main_rogue_settlement_minor_2) Level 2
점령된 대규모 정착지
(wh2_main_rogue_settlement_minor_3) Level 3
점령된 소규모 정착지
(wh2_main_rogue_settlement_minor_coast_1) Level 1
점령된 정착지
(wh2_main_rogue_settlement_minor_coast_2) Level 2
점령된 대규모 정착지
(wh2_main_rogue_settlement_minor_coast_3) Level 3
숲 야영지
(wh2_main_special_settlement_athel_loren_rogue_1) Level 1 |
|
| 진영 사용 가능 여부 | |
|---|---|
| 와류의 눈 | |
| 필멸의 제국들 | |
Factions
Units
Units in Custom Battle
Buildings
Technologies
Household
Regions
Mercenaries
Total War: Rome II
Factions
Units
Auxiliary Corps
Units in Custom Battle
Buildings
Technologies
Household
Regions
Mercenaries
Total War: Rome II: MODs
Radious Total War Mod
Divide et Impera
Total War: Rome II: ICONs
BullGod's Unit Icons
Normal's Rome II_Units Icons
Factions
Units
Shogun 2: Rise of the Samurai
Shogun 2: Fall of the Samurai
Napoleon: Total War
Factions
Units
Empire: Total War
Factions
Units
Factions
Units
Army
Buildings
Mercenaries
Retinue
Traits
Regions
Ranking
Medieval II: Total War: Kingdoms
Medieval II - Americas
Medieval II - Britannia
Medieval II - Crusades
Medieval II - Tutonic
Broken Crescent 1.05
Broken Crescent 2.02
Stainless Steel 5.1b
Stainless Steel 6.1
Deus Lo Vult 5.7
Deus Lo Vult 6.0
HTF: Eagle of the Elbe 05
The Long Road 2.0
Lands to Conquer Gold
DarthMod 1.4D: The Last Episode
Das Heilige Romische Reich 06
Third Age 1.3
Third Age 1.4
Third Age 2.1
Third Age 3.1