

 Français
 Italiano
 Deutsch
 Español
 Русский
 Čeština
 Polski
 Türkçe
 Português (Brasil)
 한국어
한국어 简体中文
简体中文 正體中文
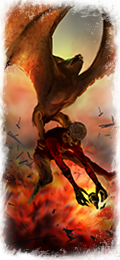
正體中文Deck Droppers (Bombers)
Beware the Deck Droppers’ black powder bombs released indiscriminately – if somewhat inaccurately – from above!When Undead pirate fleets attack on the open ocean, the first thing their victims commonly see are the hideous, flying horrors known as Deck Droppers, appearing in advance of their masters’ ships to pepper enemies with bullets from above. A Deck Dropper comprises of a bloodthirsty Fell Bat and firearm-wielding zombie ‘rider’, or more accurately, a zombie being unwittingly suspended from the Fell Bat’s talons, slightly disorientated but not without the wherewithal to fire its hand cannon. Before an attack, the Fell Bats hang in a dormant state from the topmost spars high in the rigging of Undead fleets until stirred by the anticipation that the coppery tang of blood is about to fill the air. Diving amongst their own ranks to grab a zombie, they swoop above the bedlam of battle as their passenger uses their better vantage point to fire round after round into the groups of enemies below.
 |
Unit Name Deck Droppers (Bombers) |
Main Unit Key wh2_dlc11_cst_cav_deck_droppers_1 |
Land Unit Key wh2_dlc11_cst_cav_deck_droppers_1 |
Naval Unit Key wh_main_shp_transport |
Land Unit Group |
Naval Unit Group |
Soldiers 24 |
Caste War Beast |
Category Cavalry |
Class Missile Cavalry |
Cost 500 |
Recruitment Cost 500 |
Upkeep Cost 125 |
Missile Damage 1 |
├ Missile Weapon wh2_dlc11_cst_bomb_deck_droppers |
├ Projectile wh2_dlc11_cst_bomb_deck_droppers |
├ Missile Damage 1 |
├ Missile Ap Damage 0 |
└ Base Reload Time 14 |
Accuracy 10 |
Range 60 |
Reload 10 |
Shots Per Minute 4.8 |
Ammunition 7 |
Melee Attack 26 |
Weapon Strength (Weapon Damage) 22 |
├ Melee Weapon wh_main_vmp_fell_bats |
├ Melee Damage Base 20 |
├ Melee Damage Ap 2 |
├ Armour Piercing No |
├ Bonus vs Cavalry 0 |
├ Bonus vs Elephants 0 |
└ Bonus vs Infantry 0 |
Charge Bonus 16 |
Melee Defence 22 |
├ Base Defence 22 |
├ Shield none |
└ Shield Defence 0 |
Armour 15 |
├ Armour wh2_main_leather_15 |
├ Armour Defence 15 |
└ Shield Armour 0 |
Health 184 |
├ Man Entity wh_main_infantry_zombie_blood_dismembers |
├ Man Speed 23 |
├ Man Health 8 |
├ Bonus Hit Points 168 |
├ Mount wh2_dlc11_cst_mon_deck_dropper_bat |
├ Mount Entity wh2_dlc11_cst_mon_deck_dropper_bat |
├ Mount Speed 48 |
└ Mount Health 8 |
Leadership (Base Morale) 40 |
Abilities
- Extra Powder
Because you can never have too much. - Crumbling
The dead do not rest easily in the Old World. Those summoned by Vampires and Necromancers no longer have mortal concerns - they serve only their master's will. - Disintegrating
The Dark Magic binding has failed. Both flesh and necromantic energy slough off the subjects, leaving naught but dust.
Attributes
- Causes Fear
This unit frightens all enemy units, reducing their leadership when nearby. It is also immune to fear. Fear penalties do not stack. - {{tr:wh2_dlc09_undead_description}}
Strengths & Weaknesses
- Special Ranged Weapon
This unit has a special missile attack with limited ammunition, which can be very useful when initiating attacks. - Anti-Infantry
Anti-infantry units have an advantage against targets that are smaller than a horse. This advantage can be a damage bonus against small targets, superior weight used to smash through lighter enemies, or an explosive attack from range that affects a large area.
| Requires Buildings | |
|---|---|
|
Cave of Flying Horrors
(wh2_dlc11_vampirecoast_military_flying_3) Level 2
Giant Feeding Cavern
(wh2_dlc11_vampirecoast_military_flying_4) Level 3
Crow's Nest
(wh2_dlc11_vampirecoast_ship_crows_nest_3) Level 2
Crow's Castle
(wh2_dlc11_vampirecoast_ship_crows_nest_4) Level 3 |
|
| Garrison Buildings | |
|---|---|
|
Dead Pirates' Lair
(wh2_dlc11_cst_outpostnorsca_major_4) Level 4
Anchorage of the Unliving
(wh2_dlc11_cst_outpostnorsca_major_4_coast) Level 4
Dead Pirates' Stronghold
(wh2_dlc11_cst_outpostnorsca_major_5) Level 5
Shore Fort of the Unliving
(wh2_dlc11_cst_outpostnorsca_major_5_coast) Level 5
Dead Pirates' Lair
(wh2_dlc11_vampirecoast_settlement_major_4) Level 4
Dead Pirates' Stronghold
(wh2_dlc11_vampirecoast_settlement_major_5) Level 5
Anchorage of the Unliving
(wh2_dlc11_vampirecoast_settlement_major_coast_4) Level 4
Shore Fort of the Unliving
(wh2_dlc11_vampirecoast_settlement_major_coast_5) Level 5
Occupied Massif Orcal Level 4
(wh2_dlc15_special_settlement_massif_orcal_cst_4) Level 4
Occupied Massif Orcal Level 5
(wh2_dlc15_special_settlement_massif_orcal_cst_5) Level 5
Occupied Tor Yvresse Level 4
(wh2_dlc15_special_settlement_tor_yvresse_cst_4) Level 4
Occupied Tor Yvresse Level 5
(wh2_dlc15_special_settlement_tor_yvresse_cst_5) Level 5
Occupied Altdorf Level 4
(wh2_main_special_settlement_altdorf_cst_4) Level 4
Occupied Altdorf Level 5
(wh2_main_special_settlement_altdorf_cst_5) Level 5
Forest Outpost (Lair)
(wh2_main_special_settlement_athel_loren_cst_4) Level 4
Forest Outpost (Stronghold)
(wh2_main_special_settlement_athel_loren_cst_5) Level 5
Occupied Black Crag Level 4
(wh2_main_special_settlement_black_crag_cst_4) Level 4
Occupied Black Crag Level 5
(wh2_main_special_settlement_black_crag_cst_5) Level 5
Occupied Couronne Level 4
(wh2_main_special_settlement_couronne_cst_4) Level 4
Occupied Couronne Level 5
(wh2_main_special_settlement_couronne_cst_5) Level 5
Occupied Drakenhof Level 4
(wh2_main_special_settlement_drakenhof_cst_4) Level 4
Occupied Drakenhof Level 5
(wh2_main_special_settlement_drakenhof_cst_5) Level 5
Occupied Karak Eight Peaks Level 4
(wh2_main_special_settlement_eight_peaks_cst_4) Level 4
Occupied Karak Eight Peaks Level 5
(wh2_main_special_settlement_eight_peaks_cst_5) Level 5
Occupied Gaean Vale Level 4
(wh2_main_special_settlement_gaean_vale_cst_4) Level 4
Occupied Gaean Vale Level 5
(wh2_main_special_settlement_gaean_vale_cst_5) Level 5
Occupied Hell Pit Level 4
(wh2_main_special_settlement_hellpit_cst_4) Level 4
Occupied Hell Pit Level 5
(wh2_main_special_settlement_hellpit_cst_5) Level 5
Occupied Hexoatl Level 4
(wh2_main_special_settlement_hexoatl_cst_4) Level 4
Occupied Hexoatl Level 5
(wh2_main_special_settlement_hexoatl_cst_5) Level 5
Occupied Itza Level 4
(wh2_main_special_settlement_itza_cst_4) Level 4
Occupied Itza Level 5
(wh2_main_special_settlement_itza_cst_5) Level 5
Occupied Karaz-a-Karak Level 4
(wh2_main_special_settlement_karaz_a_karak_cst_4) Level 4
Occupied Karaz-a-Karak Level 5
(wh2_main_special_settlement_karaz_a_karak_cst_5) Level 5
Occupied Khemri Level 4
(wh2_main_special_settlement_khemri_cst_4) Level 4
Occupied Khemri Level 5
(wh2_main_special_settlement_khemri_cst_5) Level 5
Occupied Kislev Level 4
(wh2_main_special_settlement_kislev_cst_4) Level 4
Occupied Kislev Level 5
(wh2_main_special_settlement_kislev_cst_5) Level 5
Occupied Konquata Level 4
(wh2_main_special_settlement_konquata_cst_4) Level 4
Occupied Konquata Level 5
(wh2_main_special_settlement_konquata_cst_5) Level 5
Occupied Lahmia Level 4
(wh2_main_special_settlement_lahmia_cst_4) Level 4
Occupied Lahmia Level 5
(wh2_main_special_settlement_lahmia_cst_5) Level 5
Occupied Lothern Level 4
(wh2_main_special_settlement_lothern_cst_4) Level 4
Occupied Lothern Level 5
(wh2_main_special_settlement_lothern_cst_5) Level 5
Occupied Miragliano Level 4
(wh2_main_special_settlement_miragliano_cst_4) Level 4
Occupied Miragliano Level 5
(wh2_main_special_settlement_miragliano_cst_5) Level 5
Occupied Naggarond Level 4
(wh2_main_special_settlement_naggarond_cst_4) Level 4
Occupied Naggarond Level 5
(wh2_main_special_settlement_naggarond_cst_5) Level 5
Pyramid of Nagash (Lair)
(wh2_main_special_settlement_pyramid_of_nagash_cst_4) Level 4
Pyramid of Nagash (Stronghold)
(wh2_main_special_settlement_pyramid_of_nagash_cst_5) Level 5
Occupied Skavenblight Level 4
(wh2_main_special_settlement_skavenblight_cst_4) Level 4
Occupied Skavenblight Level 5
(wh2_main_special_settlement_skavenblight_cst_5) Level 5 |
|
| Faction Availability | |
|---|---|
| The Eye of the Vortex | |
| Total War: WARHAMMER II |
|---|
|
Total War: WARHAMMER II |
| Factions |
| Units |
| Custom Battle Units |
| Buildings |
| Technology |
| Skills |
| Armies |
| Compare Units |
| Pirates of Sartosa Units |
|---|
| Command (3) |
| Melee Infantry (14) |
13. |
14. |
| Missile Infantry (8) |
22. |
| Missile Cavalry (3) |
| Field Artillery (2) |
29. |
30. |
Factions
Units
Units in Custom Battle
Buildings
Technologies
Household
Regions
Mercenaries
Total War: Rome II
Factions
Units
Auxiliary Corps
Units in Custom Battle
Buildings
Technologies
Household
Regions
Mercenaries
Total War: Rome II: MODs
Radious Total War Mod
Divide et Impera
Total War: Rome II: ICONs
BullGod's Unit Icons
Normal's Rome II_Units Icons
Factions
Units
Shogun 2: Rise of the Samurai
Shogun 2: Fall of the Samurai
Napoleon: Total War
Factions
Units
Empire: Total War
Factions
Units
Factions
Units
Army
Buildings
Mercenaries
Retinue
Traits
Regions
Ranking
Medieval II: Total War: Kingdoms
Medieval II - Americas
Medieval II - Britannia
Medieval II - Crusades
Medieval II - Tutonic
Broken Crescent 1.05
Broken Crescent 2.02
Stainless Steel 5.1b
Stainless Steel 6.1
Deus Lo Vult 5.7
Deus Lo Vult 6.0
HTF: Eagle of the Elbe 05
The Long Road 2.0
Lands to Conquer Gold
DarthMod 1.4D: The Last Episode
Das Heilige Romische Reich 06
Third Age 1.3
Third Age 1.4
Third Age 2.1
Third Age 3.1